Creating a Derived Theme
In this tutorial, we will learn how to make a derived theme. This is a theme that takes most of the settings from its “parent” theme and lets you change a few things to your liking without creating an entire theme package. This is a good starting point if you just want to change a few things from an existing theme, for example to give your hub a bit of personalised appearance.
We will use the standard ‘redbasic’ theme for our parent theme in this tutorial. You may have to make some adaptions if you want to use another theme as your base, but the process will be the same.
Lesson 1
To create a derived theme, first choose a name. For our example we’ll call our theme ‘mytheme’. Hopefully you’ll be a bit more creative. But throughout this document, wherever you see ‘mytheme’, replace that with the name you chose.
Directory Structure
First you need to create a theme directory structure. We’ll keep it simple. We need a php directory and a css directory. Here are the Unix/Linux commands to do this. Assume that ‘mywebsite’ is your top level hubzilla folder.
cd mywebsite
mkdir view/theme/mytheme
mkdir view/theme/mytheme/css
mkdir view/theme/mytheme/php
Great. Now we need a couple of files. The first one is your theme info file, which describes the theme.
It will be called view/theme/mytheme/php/theme.php (clever name huh?)
Inside it, put the following information - edit as needed
<?php

/**
 *   * Name: Mytheme
 *   * Description: Sample Derived theme
 *   * Version: 1.0
 *   * Author: Your Name
 *   * Compat: Red [*]
 *
 */

function mytheme_init(&$a) {

    App::$theme_info['extends'] = 'redbasic';
    }
Remember to rename the mytheme_init function with your theme name. In this case we will be extending the theme ‘redbasic’.
Now create another file. We call this a PCSS file, but it’s really a PHP file.
The file is called view/theme/mytheme/php/style.php
In it, put the following:
<?php

require_once('view/theme/redbasic/php/style.php');

echo @file_get_contents('view/theme/mytheme/css/style.css');
That’s it. This tells the software to read the PCSS information for the redbasic theme first, and then read our CSS file which will just consist of changes we want to make from our parent theme (redbasic).
Now create the actual CSS file for your theme. Put it in view/theme/mytheme/css/style.css (where we just told the software to look for it). For our example, we’ll just change the body background color so you can see that it works. You can use any CSS you’d like.
body {
    background-color: #DDD;
}
You’ve just successfully created a derived theme. This needs to be enabled in the admin “themes” panel, and then anybody on the site can use it by selecting it in Settings->Display Settings as their default theme.
Lesson 2 - Customizing the theme
Adding custom styles
In the previous lesson we added a simple style in the view/theme/mytheme/css/style.css file, just so that we could see the that our derived theme was active.
We can of course add any styles we want to that file, and since we load it after the parent theme’s styles, we are able to override the styles provided by the parent theme, or by the hubzilla core. There’s a lot that can be done with styling alone, and for many this will be all that you need to customize the theme to your liking.
Overriding templates
In some cases, overriding CSS styles may not be enough to get exactly the result you want from your theme. In these cases we can also override the templates used to build the HTML of the web pages itself.
Templates are the building blocks of the hubzilla web UI. They can be complex and contain the entire UI for a module, or simple building blocks like an input field or a button.
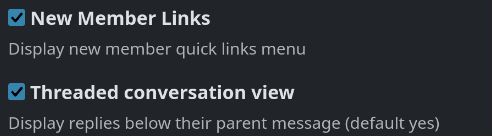
In this example we will modify the templates for checkboxes, changing them from the default toggle buttons used by Redbasic to a standard HTML checkbox.
This is what it looked like before the change:

The original template is located in view/tpl/field_checkbox.tpl. So the first thing we do is to copy this file into our theme’s template directory, that is view/theme/mytheme/tpl/field_checkbox.tpl. Then change it as you want. For this example, we change it to the following:
<div id="{{$field.0}}_container" class="clearfix checkbox mb-3">
	<input
		type="checkbox"
		name="{{$field.0}}"
		id="id_{{$field.0}}"
		value="1"
		{{if $field.2}}checked="checked"{{/if}}
		{{if $field.5}}{{$field.5}}{{/if}}
		>
	<label for="id_{{$field.0}}">
		{{$field.1}}{{if $field.6}}<sup class="required zuiqmid"> {{$field.6}}</sup>{{/if}}
	</label>
	<div class="form-text text-muted">{{$field.3}}</div>
</div>
When looking for templates, hubzilla will first look for one in the theme’s template directory, then (if relevant) in the parent theme’s directory, and finally it will look in the view/tpl directory for the system defines templates. It will use the first template found.
This means that from now on, our theme’s checkbox template will be used whenever the UI wants to display a checkbox.
This is how it looks with the change:
Also note that files should be places in subdirectories under our theme directory that matches the extension of the file. So *.css files should be in the view/theme/mytheme/css directory, *.php files in the view/theme/mytheme/php directory, and *.tpl files in the view/theme/mytheme/tpl directory.